Linting your content using Vale
Most of my experience has been working with organizations that heavily invested in DITA infrastructure. During my time with IBM, we used to depend upon Acrolinx checker to be our pseudo-editor. If you have ever used Acrolinx, you know the ease of use it offers. For organizations that invest in the docs-as-code methodology, mostly startups, might find it quite an investment to indulge in Acrolinx, and that too for the TW team (budget for TW team?).
Owing to this, though TWs at startups are massively churning out documentation, ranging from user documentation, training documents, white papers and more, they are not given access to editors. The TW team at startups is a Swiss Army knife technical writer. If you are in this situation, I would highly recommend investing your time and setting up a linter.
For my blog too, when I start writing, I am not thinking about the grammar rules that I am violating because my primary focus is to dump my thoughts. These thoughts need linting as most are conversational in nature. To solve my problem, I started researching what linters are available and at my disposal.
Though there are linters available, through research the most popular and the one that stood out was Vale.
Installing Vale
I recommend reading up on Vale and installing the tool based on your operating system. Since I am using Mac OS, the instructions are for this operating system.
To install vale:
- Open a terminal.
- Type the following command.
brew install vale - Type the following command to verify successful installation.
vale -h
Replicating the directory structure
What you did in the preceding section was install the application. This will enable you to execute commands and generate reports, but to help vale understand what the criteria must be, you need to replicate the directory structure.
To replicate the structure:
- Download the sample repository structure from GitHub.
- Open the
vale-boilerplatefolder. Copy the
vale.iniand thestylesdirectory to your blog base directory. This means both the files are at the same
hierarchy as your sub folders. The directory structure would look something like this.|$themes #themes folder in the blog base directory\ |styles ├───Microsoft ├───Vocab │ ├───Blog │ └───Marketing └───write-good |vale.ini
The vale.ini file holds information about the styles that you will use to run the linter and the styles directory holds the .yml files that enforce the rules. Learn more about these and how you can tweak as per your requirements at Vale.
For this article, I am focussing on using the standard setup as that satisfies my requirement of basic linting.
Let the linting begin
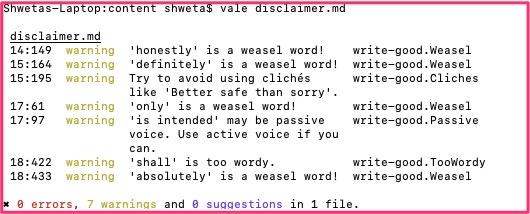
To test out Vale, I am going to use my disclaimer.md file.
To use Vale from the terminal:
- Open the terminal.
- Go to the source file folder. For my blog, it’s the
contents\blogdirectory. - Type the following command:
vale disclaimer.md
Note: You can also select all files in the folder with the
vale *.mdcommand.
Note: If you work with VS Code, you can install theValeextension. This makes authoring easy by highlighting the issues >in the editor itself.
- Analyze the errors and warnings.

Conclusion
The scope of this article might be a brief introduction to the vast capabilities that Vale offers. Tweaking Vale to suit your requirements might be a bit of a learning curve. If you are undecided, consider these points:
Pros:
- Free distribution if you go for Vale and not the Vale server.
- Ready to use Microsoft styles for tech writing projects.
- Option to customize linting specific to your standards
- Easy integration with Jenkins, Travis, or GitHub workflows.
- Supports multiple sources (.md, .rst, .adoc, and .html)
Cons:
- Learning curve
- For the Vale server, which is powerful, there is a cost involved.
